工欲善其事,必先利其器 – Sharp tools to make quality craft no.4- DIY Ikebana Shears Blade cover

I have mentioned in the previous post that Hana Basami is forged like the samurai swords. The sharp blades slice across the florals stems and branches cleanly. And because they are only joined with a loose joint in the middle, the blades can come open easily in a bag which can be dangerous.

I my last post, I have shared two different ways to fold cases for Hana basamis so to keep your “swords” secured. However, if you want something even more compact, a blade cover is a good option too.

You can buy them easily in Japan. Most are made with two pieces of leather (or thick vinyl) with a snap bottom to secure it on the tool. I have already lost two of them! So, I have decided to try to make my own by tracing one of my older one. It is relatively simple with some simple sewing techniques. You can trace around the close blade and make you own patter as well. It is a simple shape.

You need:

Vinyl/ Thick Felt

Needle and thread/ sewing machine

Pins

Marker

Sewn on Snaps / snap maker and plastic snaps

I do not have leather, but I managed to find this craft vinyl from Diaso.

It has one smooth plastic side and a soft felt side which I think is very suitable for this purpose.

1. Fold your material in half with the with the soft side facing inside. Place your template on top and trace over it with the marker.

2. Cut AROUND the marker line roughly. DO NOT cute precisely around the marker line yet- it would make that very difficult to sew.

3. Pin the two layers together with pins OUTSIDE the out line to secure the two layers of vinyl. If you have pins with a “flat” heads, use them instead, especially if you are to use the sewing machine later. I purchased my pins from Diaso as well.

4. Now sew the layers up. If you are to use a sewing machine, use the marker line to line up with the foot of your machine and set the needle about 2mm off the marker line to sew a line around it.

5. Take time to go around curve. Go slowly and lift the foot up every few stitches to change the direction of the sewing line to fit the curve of the cover. When finished, you should get something like this:

6. Now, you can cute the cover out along the marker line.

7. I have these KAM snaps pliers at home for other project, so I am going to installed my snaps this way. If you don’t have them, you can easily get sewn on metal snaps and sew them them.

8. Decide where you want you snap by slipping on your hasami for a “fitting”

9. And it is all done. Handy for carrying your hasami around safely!

I have also found some printed felt in Diaso which I think is think enough for the cover if vinyl is too hard to find. You can easily purchase thick felt from other craft stores as well. So I used that and made another one.

工欲善其事,必先利其器 – Sharp tools to make quality craft no.4 – Video Instructions for Ikebana Shears Cases Tenugui and Furoshiki versions

Fold Hana Basami (Ikebana Shears) Case with Tenugui (Japanese Towel)

Instructions to fold a Japanese Towel into a case to store the ikebana shears. The towels are quite standard in size, they are mostly approximately 35cmx 87cm and are made in cotton. For photo instructions, please refer to the previous post.

What you need:

1 Japanese Tenugui or fabric in similar size. Since all edges are hidden, you do not need to finish fray edges.

Fold Hana Basami (Ikebana Shears) Case with Furoshiki (Japanese wrapping cloth)

This is very similar with the method above except it uses a furoshiki instead of a tenugui. Furoshikis are traditional square Japanese wrapping cloths. They can be used in many ways and I particularly like to use them as carrying bags for my ikebana tools. They come in different sizes and I use one that is approximately 50x50cm. The method is very similar to the Tenugui one.

What you need:

1 50x50cm Furoshiki. Can be replaced with a piece of cotton fabric in similar size.

工欲善其事,必先利其器 – Sharp tools to make quality craft no.3 – Easy folded case for your Ikebana Shears 花鋏 Hanabasami

In the last post, we have briefly discussed about the hasami and the special care it requires.  One of the key point is keep them dry as much as possible by wiping it down in between cuts during use.  I figured out the best way is to make a fabric case for the hasami which means I will always have a “cloth” close by.  This case is made by folding a traditional Japanese towel, Tenagui “手拭”. There is no sewing involved so the towel can be unfolded for wiping up spills or for washing after use. These towels are pretty stand in size and fabric. They are mainly made with thin cotton, therefore very absorbent and easy to clean. Mostly size around 35cm x 90cm long. I have a collection of them that I use them frequently for wrapping up things like I would with furoshiki. Some of them I purchased from Japan and most of them I got them from Diaso which sell them for AUD$2.80 each (I know they are meant to be just ¥100 😑) here in Melbourne. I did not design this folding method. I adopted it from a video from YouTube that shows the instruction to make a wallet from the towel. Here is the video for your reference:

http://bit.ly/ikebanacase

And here is my step by step guide. It is just a slightly modified version of the one in the video so that it will fit the hanabasami with the ikenobo style handles. Enjoy!

1. Layout your towel. If the pattern is directional, you might want to think about which way you want.

2. Fold the bottom edge up like this. Dose not have to be precise.

3. Now fold up again. But this time you want the middle to be approx more than 12cm. Do not have to be precise. About the 2 times the width of your hanabasami.

4. Fold up again, and this time the fold should be deep enough to hold your hanabasami. Just put yours in for sizing.

5. Flip the whole towel around carefully not to undo the folds you have already done. Lay your hanabasmi in the middle so that you know how far to fold the sides towards the middle. Since not all tenagui are exactly the same width, this will help make sure the case will fit your hanbasami.

6. My tenagui is wide and so the sides meet in the middle.

7. Put aside your hanabasami and fold the top edge down following to the dimension I have marked on the photo.

8. Fold the remaining part of the tenagui back up again with the new fold line aligning with the fold behind. Depending how deep your have made your pocket and the length of the tenagui, the top edge of your towel might not be the same as my photo here.

9. Tuck the top layer into the folds behind.

10. Fold down the top layer.

11. Flip the whole thing around. You can see the pocket is formed already!

12. Tuck the top edge of the towel (which is now hanging at the bottom) into the space behind the pocket for your scissors.

13. It is done! To use, put you hanabasami in. With this design, there are two compartment you can use. I like to put mind in the “back” compartment because there is more folds of fabric to cover the tip of the blades.

14. To close the case, just ring the flap down and tuck in into the bottom.

工欲善其事,必先利其器 – Sharp tools to make quality craft no.2 – Ikebana Shears 花鋏 Hanabasami

Japanese are famous for their sword making.  Though the demand for swords has greatly declined at late 19th century, the techniques have been transferred into the making of knives and scissors/ shears.  Most of the ikebana shears today (I will refer it as hasami from here) are still made in a similar way to their bigger counterpart- samurai swords.  Hand forged with most care by craftsmen. The blades give sharp precise cut with ergonomic handles that make a pleasant “click” as the ends meet.  They are work of art themselves; giving me much pleasure every time when I have a pair in hand.

No, it is NOT absolutely essential to use them in ikebana.  But they are extremely helpful in making the precise cuts for arrangements.  Splitting the ends of Shin and Soe for a basic nageire is so much easier with the hasami. I will explain here why they are very good tools.

Metal

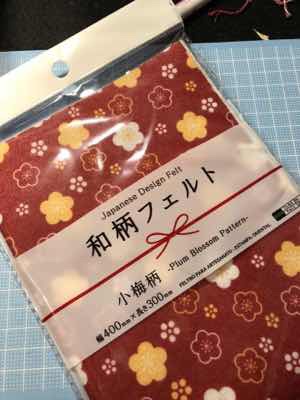
The common pair of hasami is made of steel with black oxide handles and shiny polished blades. The steel used has a very high carbon content that makes the blades extra sharp.  Though the size of these blades are not big, they are capable to cut not only stems but also branches.

Types of Shapes

There are a 2 different kinds that are commonly used: The Ikenobou Style and Koryu Style

The Ikenobou (池の坊) type is most likely the more common one.  With no “loops” at the handles, they are very slim and light to carry around, taking up very little space in the tool roll.  It is so easy to move around small spaces with their slim profile.  They range from 130mm to !80mm in length with 165mm being the most common size.  My 165mm hasami is only about 60mm wide which is almost the same size of the scissors I have on my desk!  They are precise enough to can cut thin leaves but also sharp enough for branches.  One pair will take you a long way (that is if you take care of them)!

img_4964
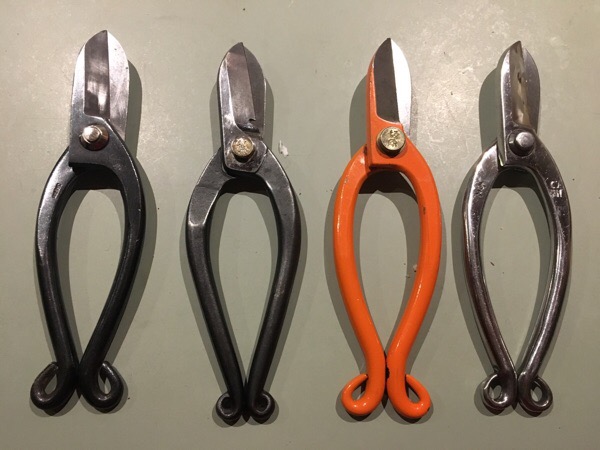
aqI From L to R:  Plain black oxide finish, oxide finish with wire cutting notch, painted finish, stainless steel

The Koryu (古流) style is very similar to the ikenobou.  They have the same blades except the Koryo ones have the “butterfly” loop handles.  They are also commonly found with black oxide finish or stainless steel.

Both types are rivet joined in the middle with NO spring grip.  Beginners are often at loss with how to grip them, especially with the Ikenobou ones which has NO loop handles.  The rivet is usually pretty loose that the hasami will open as the bottom handle drops if only the top hand is held like this:

The is the magic of this type of hasami.  It works with gravity to open the blades and only requires effort when closing to cut.  Hold the top handle with the thumb and use the other fingers to close the bottom handle to cut.  It is just that simple with only a few components.

Caring

Unless you have a pair of stainless steel ones, the traditional pair with high carbon will need some care. The black oxide coating which is normally on 95% of the hasami is only good to prevent corrosion on the handles and the body.  The shiny blades will turn dull once in contact with water and it eventually turn into black patches if left uncleaned.  Some plants with saps will turn the black immediately upon contact as well. This is due to the hight carbon content in the metal and special care has to be taken to prevent further rusting.

While in use, wipe the blades frequently.  Have you seen sushi chefs frequently wiping their knives with a towel in between slicing? Do the same. Sushi knives are made in a similar way with the high carbon steel which the moisture of the food not only “rust” the blade but the rust can also leave an undesirable taste back on the food. Carry a dry cloth to do the same with the hasami- wipe it in between cuts.  At the end of the day, dry them thoroughly and coat it with oil before putting storing away.  However, despite vigilant wiping, a dull grey surface called “patina”, will eventually formed through the years.  Some think that the patina adds character to the tool; making it personal to the owner.

IMG_1364.JPG

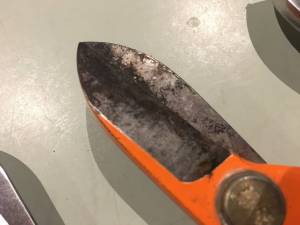
If the hasami left uncleaned for a long time, black rust will form and a bit of effort will need to clean it out.

In the last decade, I have purchased 4 pairs of hasami because I did not know how to clean them until finally bought a stainless pair 6 years ago.  Recently, I found out ways to restore them. The methods are similar to cleaning high carbon sushi knives.  If you want more info, search the internet for “cleaning high carbon steel knives”. Here is what I have learnt:

Metal Cleaner

Use the metal cleaner to clean as much of it as possible.  They usually come in a form of cream in a tube or lotion. I found it effective to take most of the rust away.  Select one that is gentle enough so that it will not corrodes your blades.  You can find them at hardware stores.  Follow the manufacturer’s instructions carefully and remember to wear gloves.

Rust Eraser

Screen Shot 2017-09-01 at 12.03.00 am.png

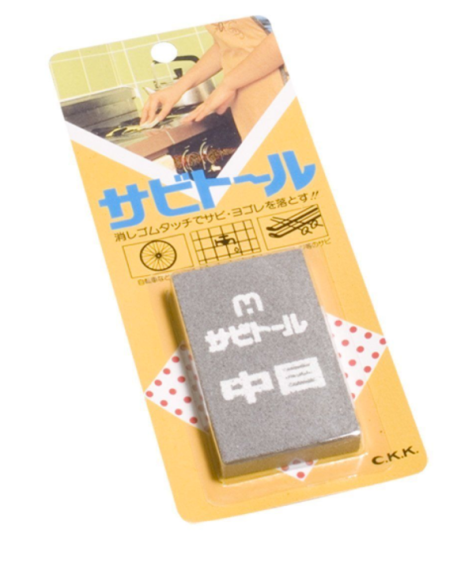
They are like mini grinding stone.  Volcanic rocks are plentiful in Japan and they are good as whetstone.  However, these stones works better when used with water and same with this Japanese rust eraser.  First, wet your eraser. Observe how the grain on your blade runs and rub the eraser in the same direction.  Very quickly, you will see the black rust fading away.  The eraser basically grind away the rust and will definitely leave markings on the surface, therefore it is important to work along the grains already on the blade.

img_1366.jpg

My hasami is 8 years old and so patine has already formed on it that made the blade slightly dull even after rubbing with the eraser.  I have no problem with that and just as happy that the rust has gone and now the hasami operates smoothly.  Like sandpaper, the eraser comes in different grades.  I bought a medium one.

Some hasami has movable bolts on the rivet so that the blades can be take apart for cleaning.

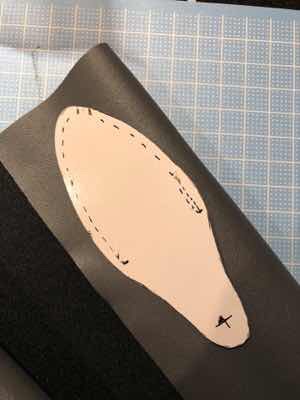
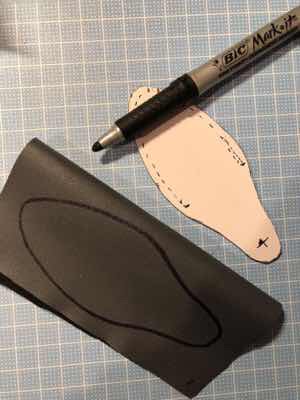
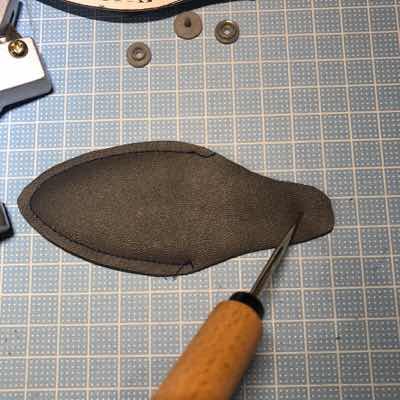
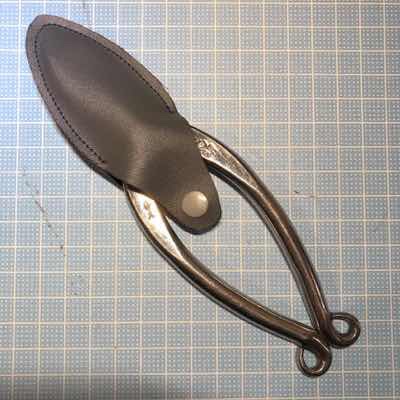
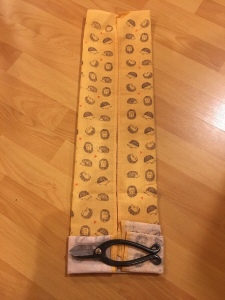
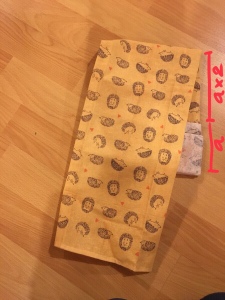
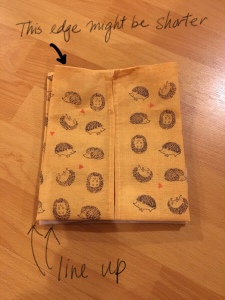
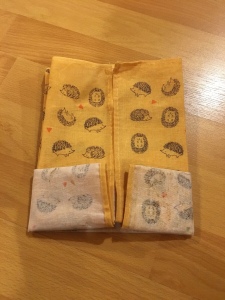
I think the best way is to prevent rusting by wiping the hasami constantly when in use. I found that the easiest way to carry a wiping cloth with my hasami is to make a hasami case with one so that I can use the case to “wipe” the tool and I shall always have a cloth close by. I have found a tenugui (Japanese cotton towel) wallet folding/wrapping instructions which can be easily modified to fold into a case for the hasami. And when the tenugui needs a wash, it can be unfolded, washed and refolded again.

I will share the instructions next time.

To protect the blades from rusting, you can also apply a thin layer of knives oil. If this particular oil is unavailable, good quality sewing machine will also do the job.

工欲善其事,必先利其器 – sharp tools to make quality craft

“工欲善其事,必先利其器” is a Chinese idoiom from the Analects of Confucius. Its direct translation can be
‘To make quality craft, first start with sharp tools “.
I was told since very little that this is the bases for all art. To play music, start with an instrument that is in tune. To write good calligraphy, start with brushes that are well conditioned. While the skills of the craftsman play a big part, the tools chosen are essential for success as well.

The same principle applies to ikebana. You need the right tools (and sharp ones literally) to make arrangements. During the past years in training, numerous times I felt lost regarding the use and the maintenance of these tools. Here in Australia, many new ikebana students are overwhelmed by these unfamiliar objects which otherwise are pretty common things in Japan. I found that there is a lack of English sources about them. And this is my motivation to write a series of articles about ikebana tools. I have not made In-depth research nor with profound knowledge of them, but these articles are merely my own experiences. I hope they will help anyone new to the art to gain some quick understanding on the tools we use.

Let me kick start the series with something “sharp” – the ikebana shears – はさみ、鋏み. The kind of shears that most people use for ikebana are quite “iconic”; very different from the western garden shears in form and operation. Many are still hand forged in a similar way to how samurai swords are made. We will discuss more about these “samurai swords” that fit in a palm next time.

It’s ikebana- It’s for all ages

20140514-172559.jpg

Ok, may be not for babies who might easily try to eat the materials than arranging them. Trust me, I know, speaking from experience. For the rest of us, who wants to take a piece of nature and transform it into art of our own here we have ikebana for all ages. The photo above are two arrangements little Miss Terrible Two has done this afternoon using some left overs from my ikebana class and branches from our garden. There were days we did not have florals and she was equally happy to just arrange leaves and branches. Overall, ikebana is NOT Japanese floral arrangement. In fact, many famous ikebana artists are NOT famous of their “floral” work. In the Sogetsu textbook, there is a chapter on arranging fruits and vegetables only!

Many find ikebana relaxing, meditative, calming. It takes you away from the huss and buss of this busy world and asks you to focus on the amazing miracle of nature- especially the piece that is in your hand that you are about to cut! It helps you to “stop and pause” in this non-stop world. It can stimulate the mind in a different way than the internet or the TV can.

What are you waiting for? Or do you know someone who can make use of some relaxing time? Regardless of age, let us gather some materials, whether is from your backyard or from the road side (I do have friends who live in a flat and she picks material from the road side!) and do some ikebana.

20140514-173355.jpg
Yes, we are lucky to have a plastic kezen

Using unlikely materials in Ikebana

Image

The wonderful thing about Ikebana is the boundless of materials we can use.  However, it has often been misunderstood with it being labeled as “Japanese Floral Art”.  Many ikebana works have NO flowers at all.  Like those by the great Ikebana Master – Tetsunori Kawana. His huge installations of bamboo outdoor sculptures are made entirely with just bamboo!   This is the beauty of ikebana.  We are not bounded by just flowers.  But all natural materials (and sometimes with unnatural ones as well) can be used.

I made this display with broccoli, tomatoes and the stems of some wilted Spanish Iris I collected when I was pruning in the garden.  The broccoli works well as a kenzan.  And surprising the stems of the Spanish Iris are strong like thin branches. You might ask, “What? You use broccoli and tomatoes and wilted flowers stems for a display?” Yes, and it was a challenge but the process was fun.  There is a lot of “things” in our fridge we can use- mainly the fruits and vegetables.  Capsicums are great as small containers with dramatic colours while peas (whole before pealed) can be wired to add into a bouquet!  Fruits like apples, oranges and lemons are great too.  And don’t just limit yourself to flowers/ foliage that purchased from shops. Look around your garden and at your park?  The fallen piece of braches along the footpath might have very interesting bends and shapes!

Here you go, you don’t need flowers to make ikebana- just look around, especially in your fridge!

Shoso Shimbo at the Toyota Sculpture Exhibition 2012

Shoso Shimbo Sculpture at the Toyota Exhibition (photo by Shoso Shimbo)

Shoso Shimbo Sculpture at the Toyota Exhibition (photo by Shoso Shimbo)


Shoso Shimbo has a new ikebana display at the Toyota Sculpture Exhibition.  It is exciting to see ikebana artist getting involved and recognised in the sculpture art sector.  Pop in to the gallery and see the work yourself. You will be amazed!

Shoso Ikebana Blog: ikebanaonline.org: Toyota Sculpture Exhibition 2012: Column by Shoso.

ASAP Ikebana

20121026-103929.jpg
Very often ikebana is misunderstood as an art that is too hard. We often see the elaborate and huge work of the masters and put ikebana in the “too hard” box not realising that ikebana can range from the garden size installation to the “1 flower 1 leave” tea cup arrangement. While a 8 metres installation might takes weeks to plan and days to construct, a tea-cup sized arrangement can be a result of hours of meditation too. But still there is always a challenge to make the what I call the  “ASAP ikebana”- quick arrangement to brighten up your day or a short meditation time for you to take your crowded mind away from busy life. All you need is a few leaves/ branches/ flower(s). I made this after running around to finish the laundry, the pile of dishes in the sink….! And those 5-10min was great – helping me to regenerate! No planning, no sketching- just making use what I’ve picked from my garden. And I must admit I’m lucky to have a pretty good garden to give me at least three different kinds of Japanese maples to start with.

So… What have you got in your garden? What can you make in 5 min? May be your three-days-old vase need rearranging? Or may be you can pick up a mixed bunch from the local fruit shop on your way home after a long day work. Take the challenge and have your mind refreshed….Ah….

川崎景太 オフィシャルウェブサイト

川崎景太 オフィシャルウェブサイト.

What a beautiful site of Japanese ikebana art in the contempory conte doesn’t matter whether you can red Japanese or not; ikebana, like all arts, has an universal language that brings people together.

Kawasaki has also appeared on Japanese TV many times demonstrating ikebana and teaching you how simple it can be though it is a very sophisticated ancient art itself. He has incorporated everyday items like kitchen utensils and even the humble plastic straws to make out standing ikebana that anyone can try at home- making ikebana accessible to everyone.

Look up clips on YouTube now and get inspired today!

Kawasaki 10min ikebana challenge

Previous Older Entries